Try out KubeBlocks with Playground
Installation
Prerequisite for Local Env
Upgrade KubeBlocks
Connect Database
Maintenance
Backup and Restore
In Place Update
Resource Scheduling
Cross K8s Deployment
Instance Template
Observability
User Management
Handle an Exception
Developer
Add an add-on to KubeBlocks
External Component
This guide walks you through the quickest way to get started with KubeBlocks on cloud, demonstrating how to create a demo environment (Playground) with one command.
When deploying KubeBlocks on the cloud, cloud resources are initialized with the help of the terraform script. kbcli downloads the script and stores it locally, then calls the terraform commands to initialize a fully-managed Kubernetes cluster and deploy KubeBlocks on this cluster.
Make sure you have all the followings prepared.
Option 1. Use aws configure.
Fill in an access key and run the command below to authenticate the requests.
aws configure
AWS Access Key ID [None]: YOUR_ACCESS_KEY_ID
AWS Secret Access Key [None]: YOUR_SECRET_ACCESS_KEY
You can refer to Quick configuration with aws configure for detailed information.
Option 2. Use environment variables.
export AWS_ACCESS_KEY_ID="YOUR_ACCESS_KEY_ID"
export AWS_SECRET_ACCESS_KEY="YOUR_SECRET_ACCESS_KEY"
kbcli playground init --cloud-provider aws --region us-west-2
cloud-provider specifies the cloud provider.region specifies the region to deploy a Kubernetes cluster.
You can find the region list on the official website.During the initialization, kbcli clones the GitHub repository to the directory ~/.kbcli/playground, installs KubeBlocks, and creates a MySQL cluster. After executing the kbcli playground init command, kbcli automatically switches the current context of kubeconfig to the new Kubernetes cluster.
Run the command below to view the created cluster.
# View kbcli version
kbcli version

# View the cluster list
kbcli cluster list
The initialization lasts about 20 minutes. If the installation fails after a long time, please check your network.
Make sure you have all the followings prepared.
Steps:
Install Google Cloud SDK.
# macOS brew install
brew install --cask google-cloud-sdk

# windows
choco install gcloudsdk
Initialize GCP.
gcloud init
Log in to GCP.
gcloud auth application-default login
Configure GOOGLE_PROJECT environment variables,kbcli playground creates GKE cluster in the project.
export GOOGLE_PROJECT=<project-name>
The following command deploys a GKE service in the region us-central1 on GCP, and installs KubeBlocks.
kbcli playground init --cloud-provider gcp --region us-central1
cloud-provider specifies the cloud provider.region specifies the region to deploy a Kubernetes cluster.During the initialization, kbcli clones the GitHub repository to the directory ~/.kbcli/playground, installs KubeBlocks, and creates a MySQL cluster. After executing the kbcli playground init command, kbcli automatically switches the current context of kubeconfig to the new Kubernetes cluster.
Run the command below to view the created cluster.
# View kbcli version
kbcli version

# View the cluster list
kbcli cluster list
The initialization takes about 20 minutes. If the installation fails after a long time, please check your network.
Make sure you have all the followings prepared.
Steps:
Log in to Tencent Cloud.
Go to Tencent Kubernetes Engine (TKE) to grant resource operation permission to your account before using the container service.
Go to API Console -> Access Key -> API Keys and click Create Key to create a pair of Secret ID and Secret Key.
Add the Secret ID and Secret Key to the environment variables.
export TENCENTCLOUD_SECRET_ID=YOUR_SECRET_ID
export TENCENTCLOUD_SECRET_KEY=YOUR_SECRET_KEY
The following command deploys a Kubernetes service in the region ap-chengdu on Tencent Cloud and installs KubeBlocks.
kbcli playground init --cloud-provider tencentcloud --region ap-chengdu
cloud-provider specifies the cloud provider.region specifies the region to deploy a Kubernetes cluster.During the initialization, kbcli clones the GitHub repository to the directory ~/.kbcli/playground, installs KubeBlocks, and creates a MySQL cluster. After executing the kbcli playground init command, kbcli automatically switches the current context of kubeconfig to the new Kubernetes cluster.
Run the command below to view the created cluster.
# View kbcli version
kbcli version

# View the cluster list
kbcli cluster list
The initialization takes about 20 minutes. If the installation fails after a long time, please check your network.
Make sure you have all the followings prepared.
Steps:
Log in to Alibaba Cloud.
Follow the instructions in Quick start for first-time users to check whether you have activated Alibaba Cloud Container Service for Kubernetes (ACK) and assigned roles.
For users who deploy Alibaba Cloud in China Mainland, refer to the corresponding guide.
Click AliyunOOSLifecycleHook4CSRole and click Agree to Authorization to create an AliyunOOSLifecycleHook4CSRole role.
This operation grant permissions to access Operation Orchestration Service (OOS) and to access the resources in other cloud products since creating and managing a node pool is required for creating an ACK cluster.
Refer to Scale a node pool for details.
Create an AccessKey ID and the corresponding AccessKey secret.
Go to Alibaba Cloud Management Console. Hover the pointer over your account console and click AccessKey Management.
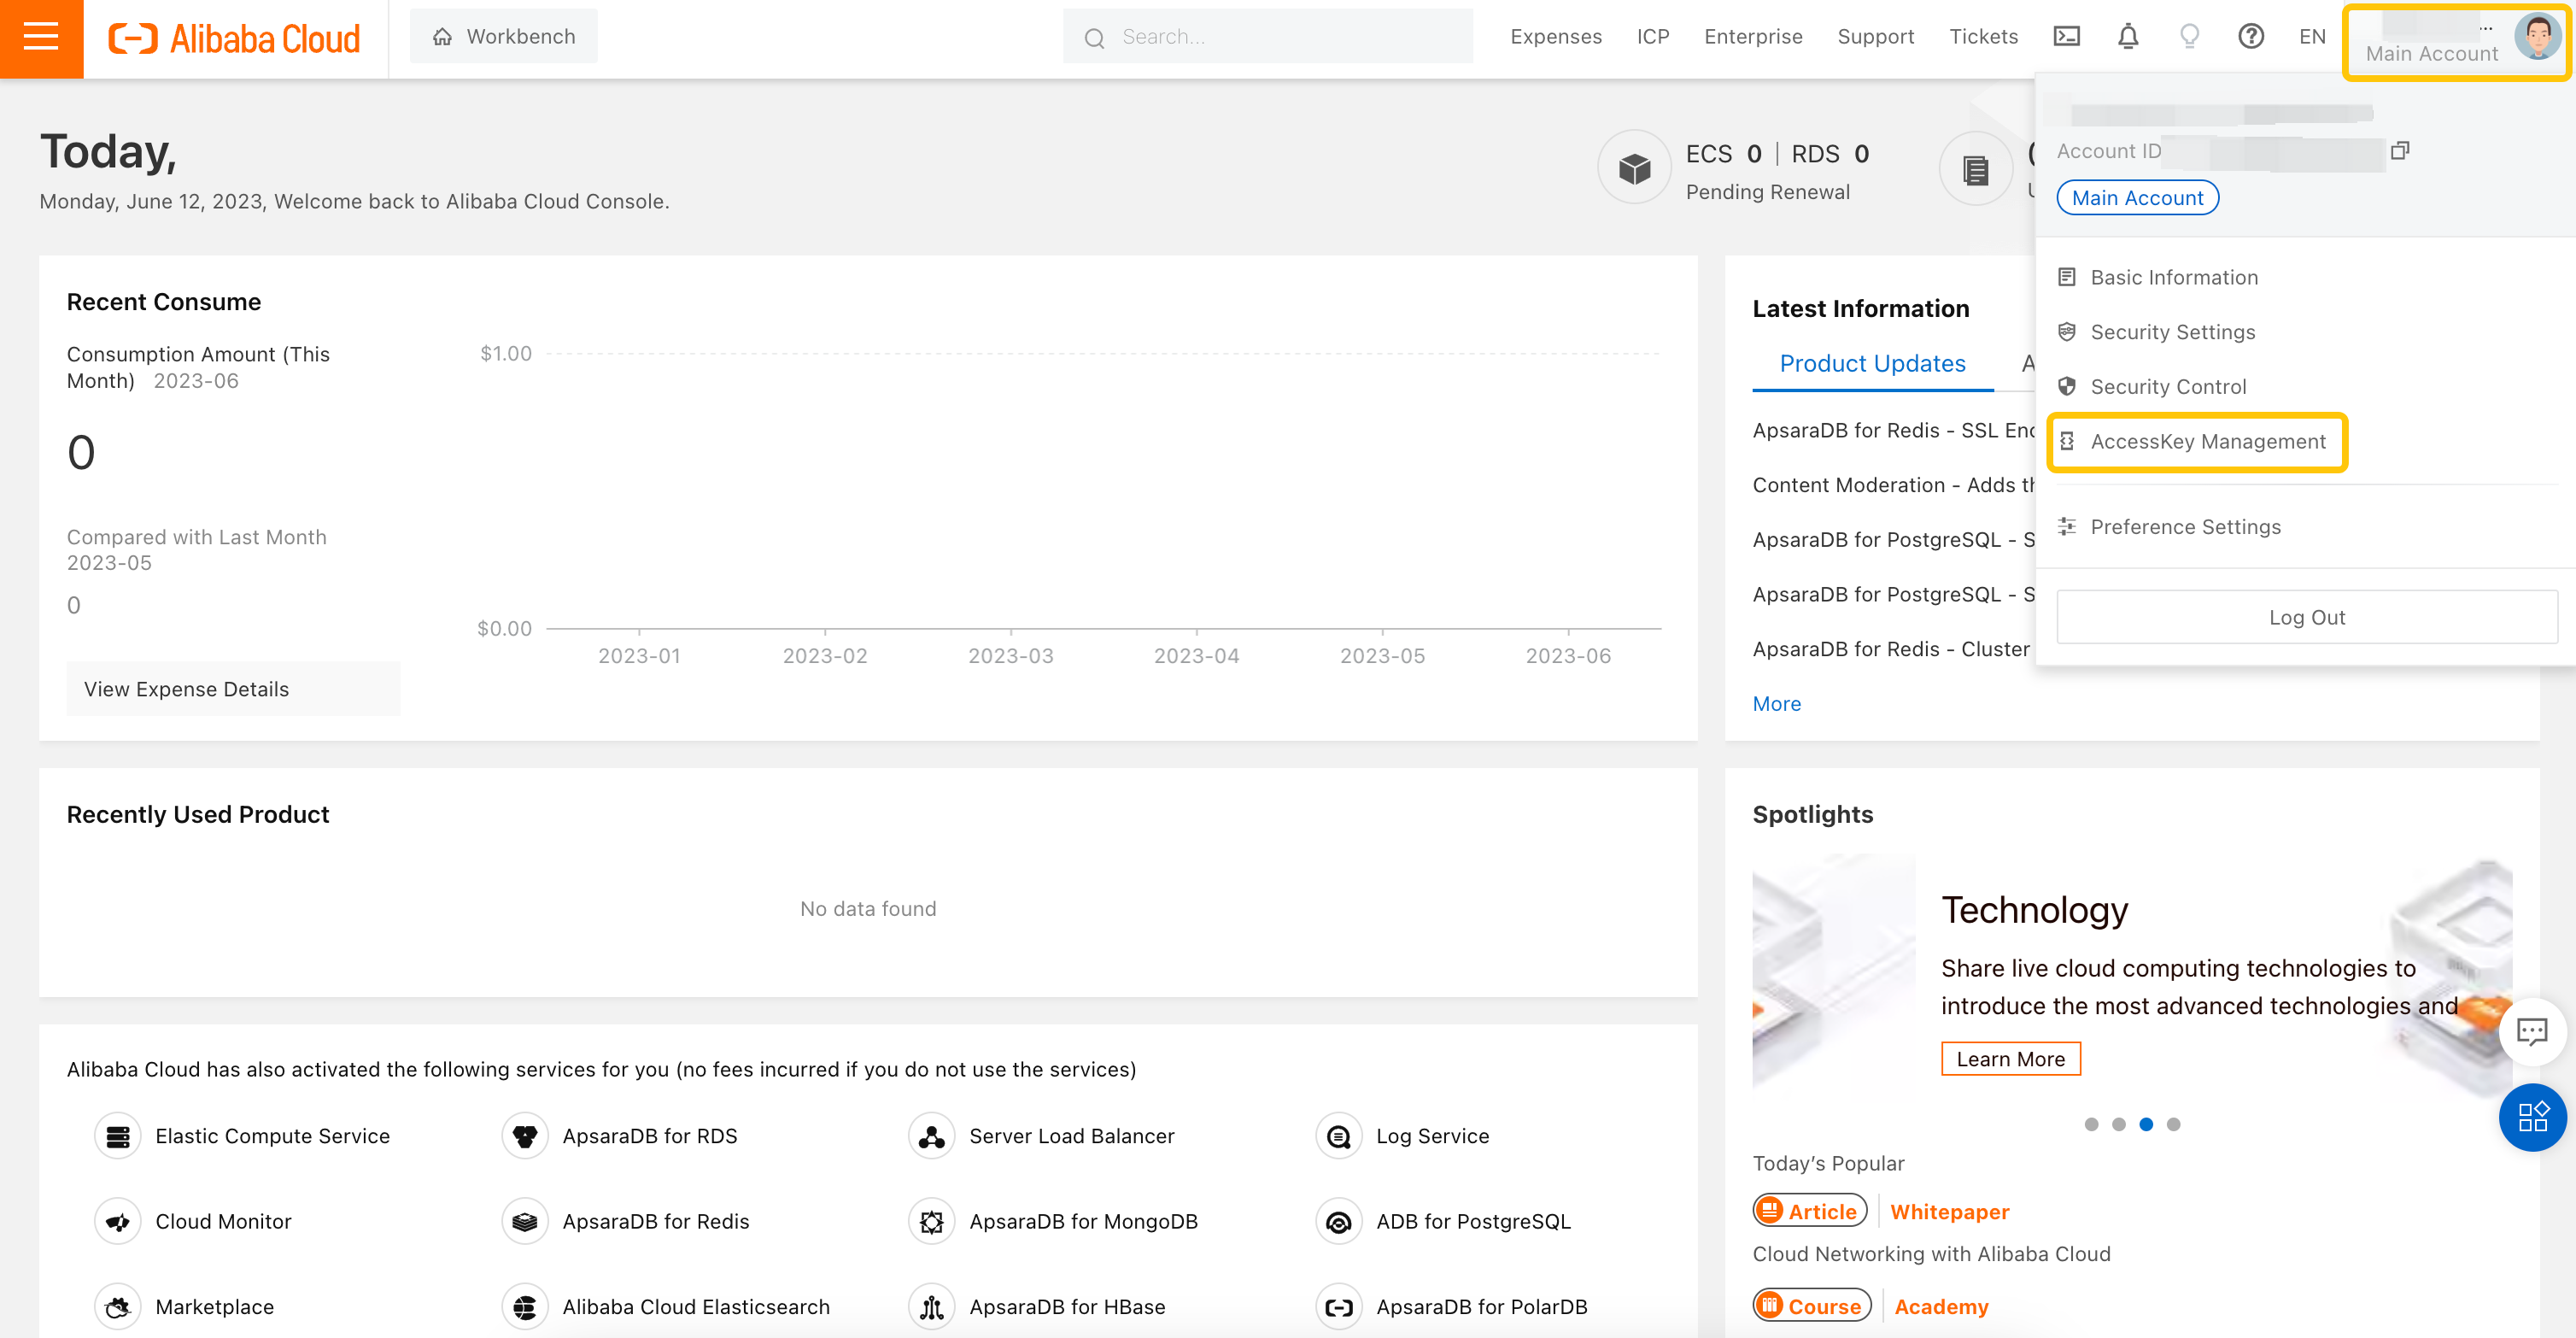
Click Create AccessKey to create the AccessKey ID and the corresponding AccessKey secret.
Add the AccessKey ID and AccessKey secret to the environment variable to configure identity authorization information.
export ALICLOUD_ACCESS_KEY="YOUR_ACCESS_KEY"
export ALICLOUD_SECRET_KEY="YOUR_SECRET_KEY"
Refer to Create an AccessKey pair for details.
The following command deploys an ACK cluster in the region cn-hangzhou on Alibaba Cloud, and installs KubeBlocks.
kbcli playground init --cloud-provider alicloud --region cn-hangzhou
cloud-provider specifies the cloud provider.region specifies the region to deploy a Kubernetes cluster.During the initialization, kbcli clones the GitHub repository to the directory ~/.kbcli/playground, installs KubeBlocks, and creates a MySQL cluster. After executing the kbcli playground init command, kbcli automatically switches the current context of kubeconfig to the new Kubernetes cluster.
Run the command below to view the created cluster.
# View kbcli version
kbcli version

# View the cluster list
kbcli cluster list
The initialization takes about 20 minutes. If the installation fails after a long time, please check your network.
Go through the following instructions to try basic features of KubeBlocks.
Steps:
View the database cluster list.
kbcli cluster list
View the details of a specified database cluster, such as STATUS, Endpoints, Topology, Images, and Events.
kbcli cluster describe mycluster
Option 1. Connect database from container network.
Wait until the status of this cluster is Running, then run kbcli cluster connect to access a specified database cluster. For example,
kbcli cluster connect mycluster
Option 2. Connect database remotely.
Steps:
Get Credentials.
kbcli cluster connect --show-example --show-password --client=cli mycluster
Run port-forward.
kubectl port-forward service/mycluster-mysql 3306:3306
>
Forwarding from 127.0.0.1:3306 -> 3306
Forwarding from [::1]:3306 -> 3306
Open another terminal tab to connect the database cluster.
mysql -h 127.0.0.1 -P 3306 -u root -p"******"
>
...
Type 'help;' or '\h' for help. Type '\c' to clear the current input statement.

mysql> show databases;
>
+--------------------+
| Database           |
+--------------------+
| information_schema |
| mydb               |
| mysql              |
| performance_schema |
| sys                |
+--------------------+
5 rows in set (0.02 sec)
This guide shows a simple failure simulation to show you the failure recovery capability of MySQL.
Delete the Standalone MySQL cluster before trying out high availability.
kbcli cluster delete mycluster
You can use kbcli to create a Raft MySQL cluster. The following is an example of creating a Raft MySQL cluster with default configurations.
kbcli cluster create --cluster-definition='apecloud-mysql' --set replicas=3
In this example, delete the leader pod to simulate a failure.
Steps:
Make sure the newly created cluster is Running.
kbcli cluster list
Find the leader pod name in Topology. In this example, the leader pod's name is maple05-mysql-1.
kbcli cluster describe maple05
>
Name: maple05         Created Time: Jan 27,2023 17:33 UTC+0800
NAMESPACE        CLUSTER-DEFINITION        VERSION                STATUS         TERMINATION-POLICY
default          apecloud-mysql            ac-mysql-8.0.30        Running        WipeOut

Endpoints:
COMPONENT        MODE             INTERNAL                EXTERNAL
mysql            ReadWrite        10.43.29.51:3306        <none>

Topology:
COMPONENT        INSTANCE               ROLE            STATUS         AZ            NODE                                                 CREATED-TIME
mysql            maple05-mysql-1        leader          Running        <none>        k3d-kubeblocks-playground-server-0/172.20.0.3        Jan 30,2023 17:33 UTC+0800
mysql            maple05-mysql-2        follower        Running        <none>        k3d-kubeblocks-playground-server-0/172.20.0.3        Jan 30,2023 17:33 UTC+0800
mysql            maple05-mysql-0        follower        Running        <none>        k3d-kubeblocks-playground-server-0/172.20.0.3        Jan 30,2023 17:33 UTC+0800

Resources Allocation:
COMPONENT        DEDICATED        CPU(REQUEST/LIMIT)        MEMORY(REQUEST/LIMIT)        STORAGE-SIZE        STORAGE-CLASS
mysql            false            <none>                    <none>                       <none>              <none>

Images:
COMPONENT        TYPE         IMAGE
mysql            mysql        docker.io/apecloud/wesql-server:8.0.30-5.alpha2.20230105.gd6b8719

Events(last 5 warnings, see more:kbcli cluster list-events -n default mycluster):
TIME        TYPE        REASON        OBJECT        MESSAGE
Delete the leader pod.
kubectl delete pod maple05-mysql-1
>
pod "maple05-mysql-1" deleted
Connect to the Raft MySQL cluster. It can be accessed within seconds.
kbcli cluster connect maple05
>
Connect to instance maple05-mysql-2: out of maple05-mysql-2(leader), maple05-mysql-1(follower), maple05-mysql-0(follower)
Welcome to the MySQL monitor.  Commands end with ; or \g.
Your MySQL connection id is 33
Server version: 8.0.30 WeSQL Server - GPL, Release 5, Revision d6b8719

Copyright (c) 2000, 2022, Oracle and/or its affiliates.

Oracle is a registered trademark of Oracle Corporation and/or its
affiliates. Other names may be trademarks of their respective
owners.

Type 'help;' or '\h' for help. Type '\c' to clear the current input statement.

mysql>
Before destroying Playground, it is recommended to delete the database clusters created by KubeBlocks.
# View all clusters
kbcli cluster list -A

# Delete a cluster
# A double-check is required or you can add --auto-approve to skip it
kbcli cluster delete <name>

# Uninstall KubeBlocks
# A double-check is required or you can add --auto-approve to skip it
kbcli kubeblocks uninstall --remove-pvcs --remove-pvs
Destroy Playground.
kbcli playground destroy
kbcli playground destroy deletes the Kubernetes cluster on the cloud, but there might be residual resources on the cloud, such as volumes and snapshots. Please delete them in time to avoid unexpected costs.