Try out KubeBlocks with Playground
Installation
Prerequisite for Local Env
Upgrade KubeBlocks
Connect Database
Maintenance
Backup and Restore
In Place Update
Resource Scheduling
Cross K8s Deployment
Instance Template
Observability
User Management
Handle an Exception
Developer
Add an add-on to KubeBlocks
External Component
Before connecting to the MySQL database running inside your Kubernetes cluster, you may need to retrieve the username and password from a Kubernetes Secret. Secrets in Kubernetes are typically base64-encoded, so you will need to decode them to obtain the actual credentials. Here’s how you can do this with kubectl.
Retrieve the username:
Use the kubectl get secrets command to extract the username from the secret named mycluster-conn-credential in the demo namespace.
kubectl get secrets -n demo mycluster-conn-credential -o jsonpath='{.data.username}' | base64 -d
>
root
Retrieve the password:
kubectl get secrets -n demo mycluster-conn-credential -o jsonpath='{.data.password}' | base64 -d
>
2gvztbvz
In most KubeBlocks v0.9 addons, the secret that contains the connection credentials follows the naming pattern {cluster.name}-conn-credential. However, in some newer versions of KubeBlocks addons, the naming of the secret may have changed to {cluster.name}-{component.name}-account-{account.name}. To ensure you are using the correct secret name, run the following command to list all secrets in the namespace and search for the ones related to your database cluster.
Example:
kubectl get secrets -n demo | grep mycluster
After retrieving the credentials, you can connect to the MySQL database running in your Kubernetes cluster using one of two methods:
kubectl exec to connect directly within the Pod.kubectl port-forward to access the database from your local machine.In some cases, you may need to connect directly to a MySQL database running inside a Kubernetes Pod without relying on external access. Using kubectl exec, you can enter the Pod and interact with the MySQL instance directly from within the cluster, avoiding the need for an external database address.
Run the kubectl exec command and specify the pod to be connected.
Use the kubectl exec command to open an interactive shell session inside the MySQL Pod. This allows you to run commands directly within the Pod's environment.
kubectl exec -ti -n demo mycluster-mysql-0 -- bash
-ti: Opens an interactive terminal session (-t allocates a TTY, and -i passes stdin to the container).-n demo: Specifies the demo namespace where your Pod is running.mycluster-mysql-0: The name of the MySQL Pod. Make sure to replace this with the actual Pod name if it's different.-- bash: Opens a Bash shell inside the Pod. You can also use sh if Bash is not available in the container.Connect to the cluster.
Once inside the Pod, you can use the MySQL client to connect to the database service running within the same Pod or cluster. Since you're already inside the Pod, you don't need to specify an external host or address.
mysql -u root -p2gvztbvz
When working with databases deployed in a Kubernetes cluster, you can use kubectl port-forward to securely connect to the database from your local machine. This command forwards traffic from your local port to a port in the Kubernetes cluster, allowing you to access the database service as if it were running locally.
Here is an example of using CLI to connect to the cluster on the local host.
Forward the Port Using kubectl port-forward.
First, you'll need to forward a port from your local machine to the MySQL service running in Kubernetes. This command forwards your local port 3306 (the default MySQL port) to the same port on the MySQL service inside the cluster.
kubectl port-forward svc/mycluster-mysql 3306:3306 -n demo
svc/mycluster-mysql: Refers to the MySQL service in your Kubernetes cluster.3306:3306: Binds the local port 3306 to the service's port 3306.-n demo: Specifies the namespace demo where the MySQL service is running.Connect to the Database Locally.
Once the port is forwarded, you can connect to the MySQL database using a standard MySQL client as if it were running locally on 127.0.0.1 (localhost). The connection will be securely tunneled to the service inside the cluster.
mysql -h 127.0.0.1 -P 3306 -u root -p2gvztbvz
You can use the kbcli cluster connect command and specify the cluster name to be connected.
kbcli cluster connect ${cluster-name}
The lower-level command is actually kubectl exec. The command is functional as long as the K8s API server is accessible.
Execute the following command to get the network information of the targeted database and connect it with the printed IP address.
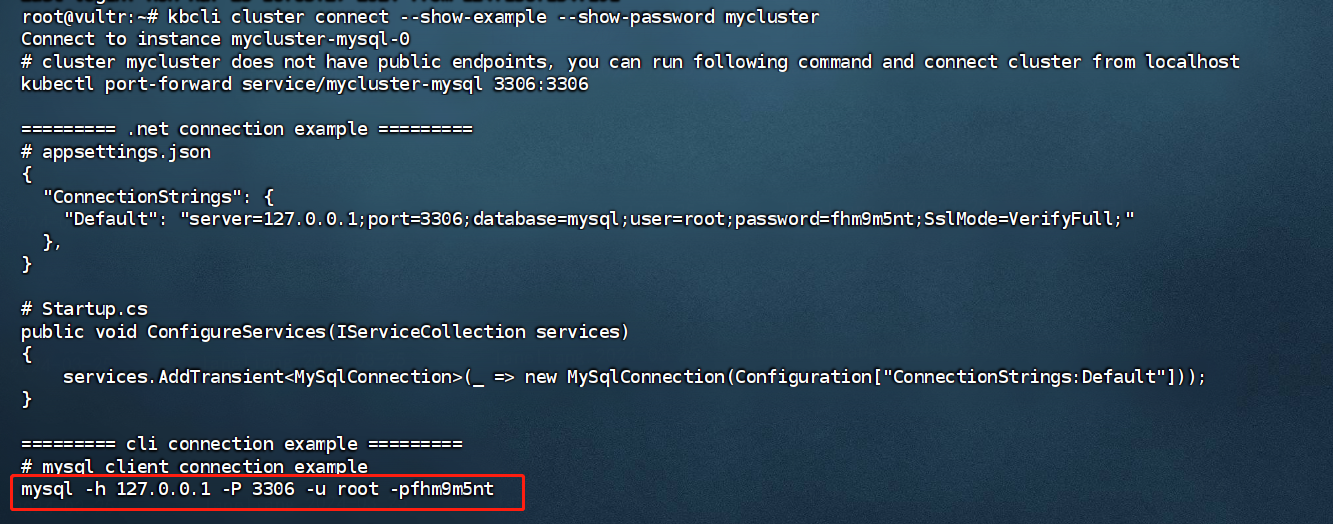
kbcli cluster connect --show-example --show-password ${cluster-name}
Information printed includes database addresses, port No., username, password. The figure below is an example of MySQL database network information.
hQBCKZLI.The password does not include -p.