ApeCloud MySQL Proxy
Before you start
- Install KubeBlocks.
- Prepare an ApeCloud MySQL RaftGroup named
myclusterfor demonstrating how to enable the proxy function for an existing cluster. Refer to Create a MySQL cluster for details.
Create a Proxy Cluster
Add the KubeBlocks repository.
helm repo add kubeblocks https://apecloud.github.io/helm-chartsView the repository list to verify whether the KubeBlocks repository is added successfully.
helm repo listRun the update command to make sure you have added the latest version.
helm repo updateInstall etcd to create the external service reference.
View all versions of etcd.
helm search repo kubeblocks/etcd --devel --versionsInstall the etcd addon.
helm install etcd kubeblocks/etcd --version=v0.6.5Install the etcd cluster.
helm install etcd-cluster kubeblocks/etcd-clusterview the status of the etcd cluster and make sure it is running.
kubectl get cluster
>
NAME           CLUSTER-DEFINITION   VERSION       TERMINATION-POLICY   STATUS      AGE
etcd-cluster   etcd                 etcd-v3.5.6   Halt                 Running     10s
View the service address of this etcd clsuter.
kubectl get service
>
NAME                             TYPE        CLUSTER-IP     EXTERNAL-IP   PORT(S)                                                  AGE
etcd-cluster-etcd                ClusterIP   10.110.23.89   <none>        2379/TCP                                                 55s
etcd-cluster-etcd-headless       ClusterIP   None           <none>        2379/TCP,2380/TCP,3501/TCP,50001/TCP                     55s
kubernetes                       ClusterIP   10.96.0.1      <none>        443/TCP                                                  13m
You can combine the service address to get the endpoint or you can use the IP of the service address as the access address.
Here is an example of combining the service address.
etcd-cluster-etcd.default.svc.cluster.local:2379
Create an ApeCloud MySQL Proxy Cluster.
View all versions of ApeCloud MySQL Proxy.
helm search repo kubeblocks/apecloud-mysql --devel --versions(Optional) If you disable the
apecloud-mysqladdon when installing KuebBlocks, run the command below to specify a version and install the cluster definition of ApeCloud MySQL. Skip this step if you install KubeBlocks with the default settings.helm install myproxy kubeblocks/apecloud-mysql --version=v0.9.0Create an ApeCloud MySQL Proxy Cluster.
helm install myproxy kubeblocks/apecloud-mysql-cluster --version=v0.9.0 --set mode=raftGroup,proxyEnabled=true,etcd.serviceReference.endpoint="etcd-cluster-etcd.default.svc.cluster.local:2379"
If you only have one node for deploying a RaftGroup Cluster, set the extra.availability-policy as none when creating a RaftGroup Cluster.
helm install myproxy kubeblocks/apecloud-mysql-cluster --version=v0.9.0 --set mode=raftGroup,proxyEnabled=true,etcd.serviceReference.endpoint="etcd-cluster-etcd.default.svc.cluster.local:2379" --set extra.availabilityPolicy=none
Check the status of the clusters.
kubectl get cluster

kubectl get pods
You can also enter the etcd container or wesql-scale container to view the configuration of wesql-scale or to check the availability of the etcd service.
etcdctl --endpoints=http://etcd-cluster-etcd.default.svc.cluster.local:2379 get /vitess --prefix --keys-only
Enable/Disable Proxy dynamically
As its name suggests, ApeCloud MySQL Proxy in nature is a database proxy. An ApeCloud MySQL RaftGroup Cluster that already exists can be switched to an ApeCloud MySQL Proxy Cluster by setting proxyEnabled=true.
helm upgrade mycluster kubeblocks/apecloud-mysql-cluster --set mode=raftGroup,proxyEnabled=true,etcd.serviceReference.endpoint="etcd-cluster-etcd.default.svc.cluster.local:2379"
If you want to disable proxy, run the command below.
helm upgrade mycluster kubeblocks/apecloud-mysql-cluster --set mode=raftGroup
Connect Proxy Cluster
ApeCloud MySQL Proxy is routed through the vtgate component, and the way the MySQL Server accesses vtgate is similar to the way of accessing mysqld. The external SQL access address provided by ApeCloud MySQL Proxy is the vtgate address and port. The vtgate address created by KubeBlocks by default is myproxy-cluster-vtgate-headless, and the port number is 15306. You can visit ApeCloud MySQL Proxy through the MySQL Server in any pod under the same namespace as ApeCloud MySQL Proxy.
Connect Proxy Cluster by VTGate
Expose the port of VTGate to the localhost so that the localhost can access the Proxy.
kubectl port-forward svc/vt-vtgate-headless 15306:15306Connect to the cluster.
mysql -h 127.0.0.1 -P 15306
Connect Proxy Cluster by MySQL Server
Expose the port of the MySQL Server to the localhost so that the localhost can access the MySQL Server.
kubectl port-forward svc/vt-mysql 3306:3306Connect to the cluster.
mysql -h 127.0.0.1 -P 3306
If you need to test the failover of MySQL, you need to delete the Pod first and continue to port-forward the port, and you can also write a shell script. Here are examples.
For VTGate,
while true; do date; kubectl port-forward svc/vt-vtgate-headless 15306:15306; sleep 0.5; done
For the MySQL Server,
while true; do date; kubectl port-forward svc/vt-mysql 3306:3306; sleep 0.5; done
Configure Proxy Cluster parameters
VTGate, VTConsensus, and VTTablet support parameter configuration. You can configure the proxy cluster by editing the configuration file or by performing an OpsRequest.
- Edit config file
- OpsRequest
Get the configuration file of this cluster.
kubectl edit configurations.apps.kubeblocks.io myproxy-vtgateConfigure parameters according to your needs. The example below adds the
spec.configFileParamspart to configuremax_connections.spec:
clusterRef: myproxy
componentName: vtgate
configItemDetails:
- configFileParams:
vtgate.cnf:
parameters:
healthcheck_timeout: "5s"
configSpec:
constraintRef: mysql-scale-vtgate-config-constraints
name: vtgate-config
namespace: kb-system
templateRef: vtgate-config-template
volumeName: mysql-scale-config
name: vtgate-config
payload: {}Connect to this cluster to verify whether the configuration takes effect.
Expose the port of the MySQL Server to the localhost so that the localhost can access the MySQL Server.
kubectl port-forward svc/vt-vtgate-headless 15306:15306Connect to this cluster and verify whether the parameters are configured as expected.
mysql -h 127.0.0.1 -P 3306

>
mysql> show variables like 'healthcheck_timeout';
+---------------------+-------+
| Variable_name       | Value |
+---------------------+-------+
| healthcheck_timeout |  5s   |
+---------------------+-------+
1 row in set (0.00 sec)
Apply an OpsRequest to the specified cluster. Configure the parameters according to your needs.
An example of configuring VTTablet
apiVersion: apps.kubeblocks.io/v1alpha1
kind: OpsRequest
metadata:
  name: acmysql-vttablet-reconfiguring
  namespace: default
spec:
  clusterName: acmysql-cluster
  force: false
  reconfigure:
    componentName: mysql
    configurations:
      - keys:
          - key: vttablet.cnf
            parameters:
              - key: health_check_interval
                value: 4s
        name: vttablet-config
  preConditionDeadlineSeconds: 0
  type: Reconfiguring
An example of configuring VTGate
apiVersion: apps.kubeblocks.io/v1alpha1
kind: OpsRequest
metadata:
  name: acmysql-vtgate-reconfiguring
  namespace: default
spec:
  clusterName: acmysql-cluster
  force: false
  reconfigure:
    componentName: vtgate
    configurations:
    - keys:
      - key: vtgate.cnf
        parameters:
        - key: healthcheck_timeout
          value: 2s
      name: vtgate-config
  preConditionDeadlineSeconds: 0
  type: Reconfiguring
Log
You can view the log files of components, Pods, and containers.
View the log of VTGate.
kubectl logs myproxy-cluster-vtgate-8659d5db95-4dzt5
View the log of VTTablet and -c is required.
kubectl logs myproxy-cluster-mysql-0 -c vttablet
Enter the container and view more logs of VTGate.
kubectl exec -it myproxy-cluster-vtgate-8659d5db95-4dzt5 -- bash
ls /vtdataroot
Enter the container and view more logs of VTTablet.
kubectl exec -it myproxy-cluster-mysql-0  -c vttablet -- bash
ls /vtdataroot
Monitoring
You can monitor the performance of the proxy cluster.
Enable the monitoring addons.
For the testing/demo environment, run the commands below to enable the monitoring addons provided by KubeBlocks.
helm install prometheus kubeblocks/prometheus --namespace kb-system --create-namespace
helm install prometheus kubeblocks/prometheus --namespace kb-system --create-namespace
helm install prometheus kubeblocks/prometheus --namespace kb-system --create-namespace
For the production environment, you can integrate the monitoring components. For details, you can refer to the relevant docs provided by the monitoring tools.
Check whether the monitoring function of this proxy cluster is enabled.
kubectl get cluster myproxy -o yamlIf the output YAML file shows
disableExporter: false, the monitoring function of this proxy cluster is enabled.If the monitoring function is not enabled, run the command below to enable it first.
kubectl patch cluster mycluster -n demo --type "json" -p '[{"op":"add","path":"/spec/componentSpecs/0/disableExporter","value":false}]'View the dashboard.
For the testing/demo environment, run the commands below to view the Grafana dashboard.
# 1. Get the username and password
kubectl get secret grafana -n kb-system -o jsonpath='{.data.admin-user}' |base64 -d

kubectl get secret grafana -n kb-system -o jsonpath='{.data.admin-password}' |base64 -d

# 2. Connect to the Grafana dashboard
kubectl port-forward svc/grafana -n kb-system 3000:8

# 3. Open the web browser and enter the address 127.0.0.1:3000 to visit the dashboard.

# 4. Enter the username and password obtained from step 1.
For the production environment, you can view the dashboard of the corresponding cluster via Grafana Web Console. For more detailed information, see the Grafana dashboard documentation.
If there is no data in the dashboard, you can check whether the job is
kubeblocks-service. Enterkubeblocks-servicein the job field and press the enter button.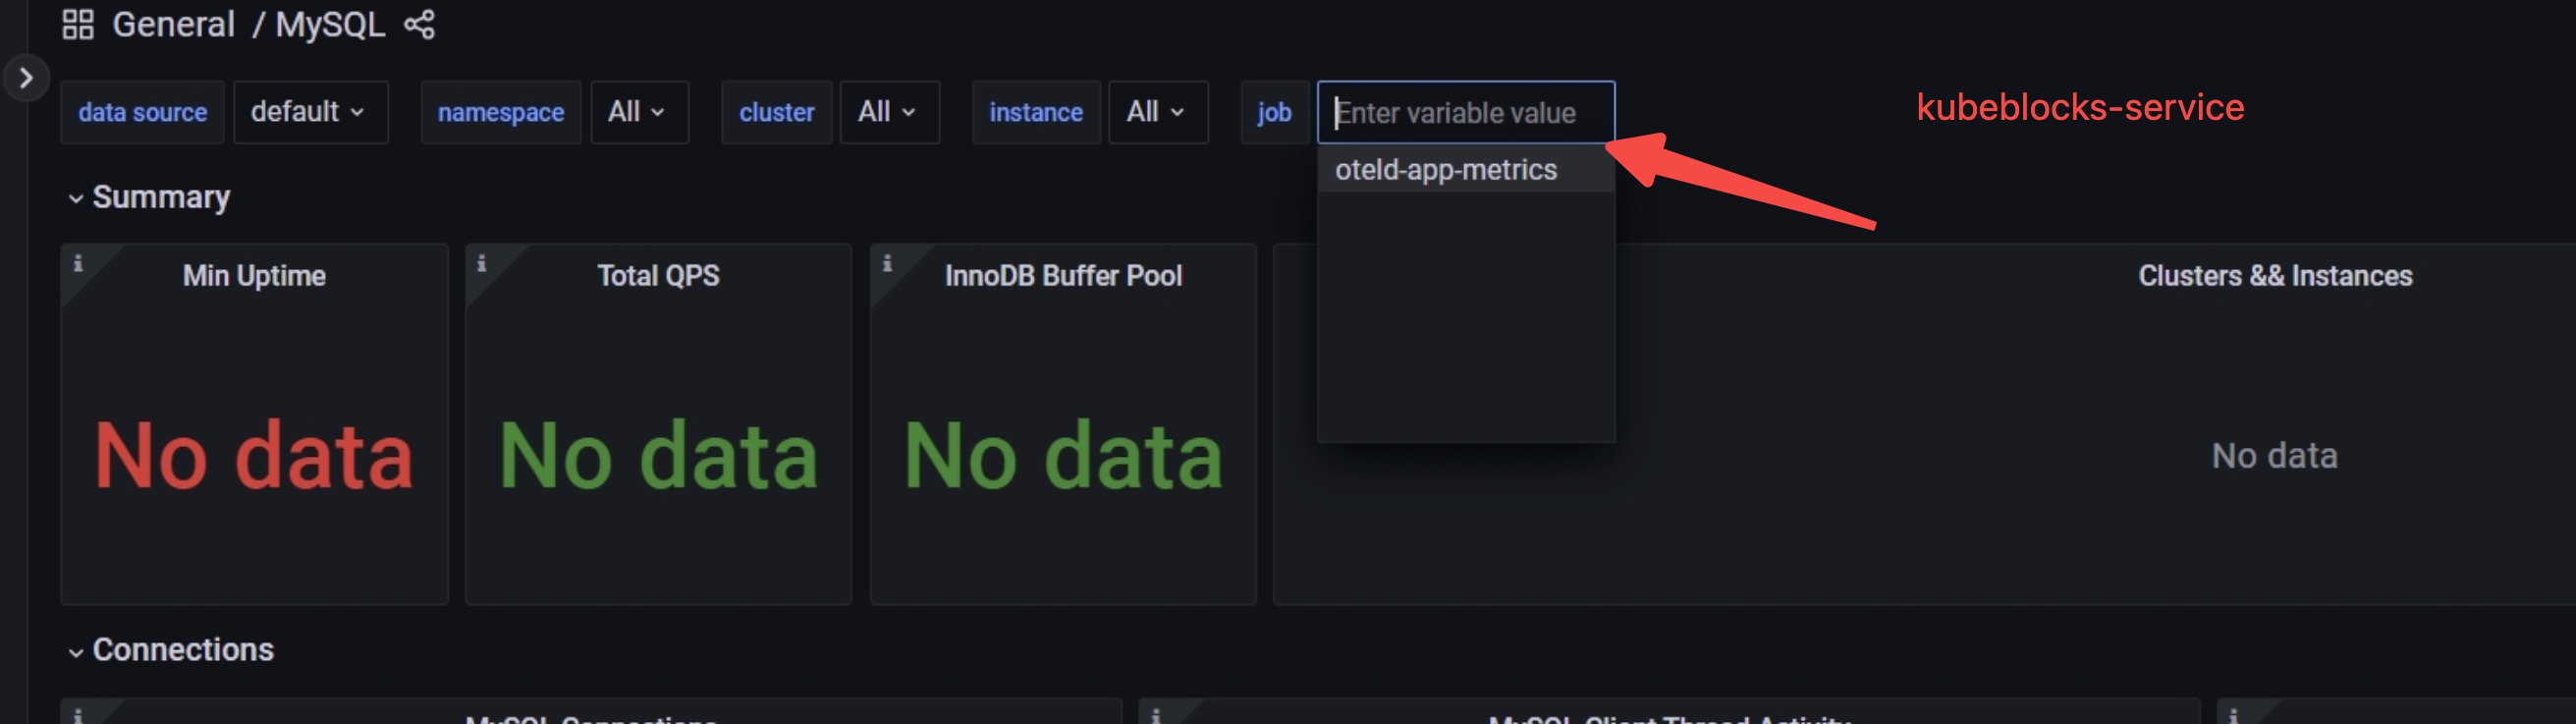
For more details on the monitoring function, you can refer to Monitoring.
Read-write splitting
You can enable the read-write splitting function.
Get the configuration file of this cluster.
kubectl edit configurations.apps.kubeblocks.io myproxy-vtgateConfigure
read_write_splitting_policyasrandom.spec:
clusterRef: myproxy
componentName: vtgate
configItemDetails:
- configFileParams:
vtgate.cnf:
parameters:
read_write_splitting_policy: "random"
configSpec:
constraintRef: mysql-scale-vtgate-config-constraints
name: vtgate-config
namespace: kb-system
templateRef: vtgate-config-template
volumeName: mysql-scale-config
name: vtgate-config
payload: {}
You can also set the ratio for read-write splitting and here is an example of directing 70% flow to the read-only node.
spec:
   clusterRef: myproxy
   componentName: vtgate
   configItemDetails:
   - configFileParams:
      vtgate.cnf:
         parameters:
            read_write_splitting_rati: "70"
      configSpec:
      constraintRef: mysql-scale-vtgate-config-constraints
      name: vtgate-config
      namespace: kb-system
      templateRef: vtgate-config-template
      volumeName: mysql-scale-config
      name: vtgate-config
      payload: {}
Transparent failover
Run the command below to perform a transparent failover.
Get the configuration file of this cluster.
kubectl edit configurations.apps.kubeblocks.io myproxy-vtgateConfigure
enable_bufferastrue.spec:
clusterRef: myproxy
componentName: vtgate
configItemDetails:
- configFileParams:
vtgate.cnf:
parameters:
enable_buffer: "true"
configSpec:
constraintRef: mysql-scale-vtgate-config-constraints
name: vtgate-config
namespace: kb-system
templateRef: vtgate-config-template
volumeName: mysql-scale-config
name: vtgate-config
payload: {}