When it comes to building a self-hosted Docker image repository, Harbor is often a highly recommended choice. However, Harbor does not come with a built-in HA (high availability) integration, which makes its services relatively unreliable. To create a HA Harbor cluster, developers typically need to set up their own HA Redis and PostgreSQL clusters, which can be quite cumbersome.
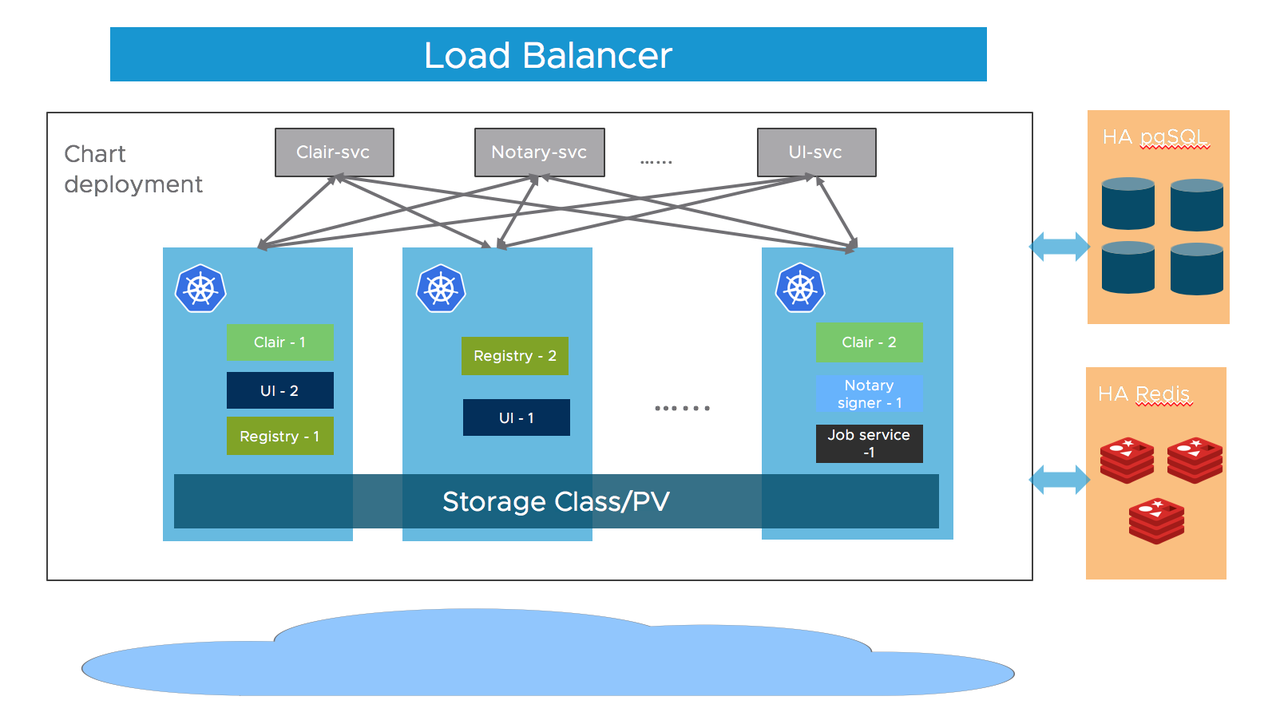
Figure 1. Architecture of Harbor
Fortunately, you can now use KubeBlocks to set up a high-availability Harbor cluster with just a few steps.
KubeBlocks is an open-source control plane software that runs and manages databases, message queues and other data infrastructure on K8s, and it could manage various types of engines, including RDBMSs (MySQL, PostgreSQL), Caches (Redis), NoSQLs (MongoDB), MQs (Kafka, Pulsar), etc.
In this blog, we will explain how to use KubeBlocks to build a HA Harbor cluster in just 5 minutes.
Before you start, make sure your environment meets the requirements of KubeBlocks and Harbor.
Install kbcli.
curl -fsSL https://kubeblocks.io/installer/install_cli.sh | bash
Install KubeBlocks.
kbcli kubeblocks install
Check whether KubeBlocks is installed successfully.
kbcli kubeblocks status
Enable the postgresql and redis addons. By default, the two addons are enabled. You can check the status of the addons by running the following command. If they're not enabled, follow the guidelines here to enable them.
kbcli addon list
To keep things isolated, create a separate namespace called demo.
kubectl create namespace demo
Create a PostgreSQL cluster. Here we use the replication mode, which creates a Replication Cluster to support automatic failover. For more details, refer to Create PostgreSQL cluster.
kbcli cluster create postgresql mypg --mode replication --namespace demo
Create a Redis cluster. Here we create a Redis Replication Cluster and specify the version as redis-7.0.6, and KubeBlocks will create a primary-secondary redis cluster with sentinel. For more details, refer to Create Redis cluster.
kbcli cluster create redis myredis --mode replication --version redis-7.0.6 --namespace demo
View the status of clusters. Wait until the status of both clusters becomes Running.
kbcli cluster list --namespace demo
You can also connect to the cluster following the detailed guidelines here based on different scenarios. For convenience, we will use the test environment for demonstration.
Connect to the PostgreSQL cluster.
kbcli cluster connect mypg --namespace demo
In PostgreSQL CLI, create a new user.
create user test with password 'password';
Create a new database registry for Harbor.
CREATE DATABASE registry OWNER test;
Users and databases created here will be used later when installing Harbor.
Connect to the Redis cluster.
kbcli cluster connect myredis --namespace demo
Create a user.
ACL SETUSER test on >password ~* +@all
Download the Harbor Helm chart.
helm repo add harbor https://helm.goharbor.io

helm fetch harbor/harbor --untar
Get information about services in cluster. The ClusterIP of mypg-postgresql and myredis-redis-redis is the address that Harbor connects to.
kubectl get service -n demo
>
NAME                                    TYPE           CLUSTER-IP       EXTERNAL-IP    PORT(S)                                                  AGE
mypg-postgresql                         ClusterIP      172.16.155.121   <none>         5432/TCP,6432/TCP                                        74m
myredis-redis-redis                     ClusterIP      172.16.190.126   <none>         6379/TCP                                                 66m
Configure the PostgreSQL database in values.yaml. Use the external database KubeBlocks provides and fill in the necessary database information. For other configurations (e.g. expose.type), refer to the official documentation.
database:
  type: external
  ...
  external:
    host: "172.16.155.121" # clusterIP of postgresql
    port: "5432"
    username: "test"       # your username
    password: "password".  # your password
    coreDatabase: "registry" # your database name
    existingSecret: ""
    sslmode: "disable"
Configure the Redis database in values.yaml.
redis:
  type: external
  ...
  external:
    addr: "172.16.190.126:6379" # clusterIp of redis: port
    sentinelMasterSet: ""
    coreDatabaseIndex: "0"
    jobserviceDatabaseIndex: "1"
    registryDatabaseIndex: "2"
    trivyAdapterIndex: "5"
    username: "test"        # your username
    password: "password"    # your password
    existingSecret: ""
Install Harbor.
helm install myharbor. -n demo
Check the status of pods. Make sure all services are running.
kubectl get pods -n demo
>
NAME                                   READY   STATUS    RESTARTS   AGE
myharbor-core-66d95c9f45-vpcnn         1/1     Running   0          44m
myharbor-jobservice-85b5676456-kl5r9   1/1     Running   0          44m
myharbor-nginx-55dd86f5d8-s78gn        1/1     Running   0          44m
myharbor-portal-869c6656c5-5dtsc       1/1     Running   0          44m
myharbor-registry-c66cd79b-77k5j       2/2     Running   0          44m
myharbor-trivy-0                       1/1     Running   0          44m
mypg-postgresql-0                      4/4     Running   0          65m
mypg-postgresql-1                      4/4     Running   0          82s
myredis-redis-0                        3/3     Running   0          57m
myredis-redis-1                        3/3     Running   0          57m
myredis-redis-sentinel-0               1/1     Running   0          58m
myredis-redis-sentinel-1               1/1     Running   0          58m
myredis-redis-sentinel-2               1/1     Running   0          58m
Now you can access Harbor UI as usual.
To illustrate the high availability of the Harbor cluster built with KubeBlocks, we will simulate a failure of the primary pod of the PostgreSQL cluster.
View the initial status of the PostgreSQL cluster and pods. Currently, mypg-postgresql-0 is the primary pod and mypg-postgresql-1 is the secondary pod.
kubectl -n demo get pod -L kubeblocks.io/role
>
NAME                                   READY   STATUS    RESTARTS   AGE     ROLE
...
mypg-postgresql-0                      4/4     Running   0          66m     primary
mypg-postgresql-1                      4/4     Running   0          66m     secondary
...
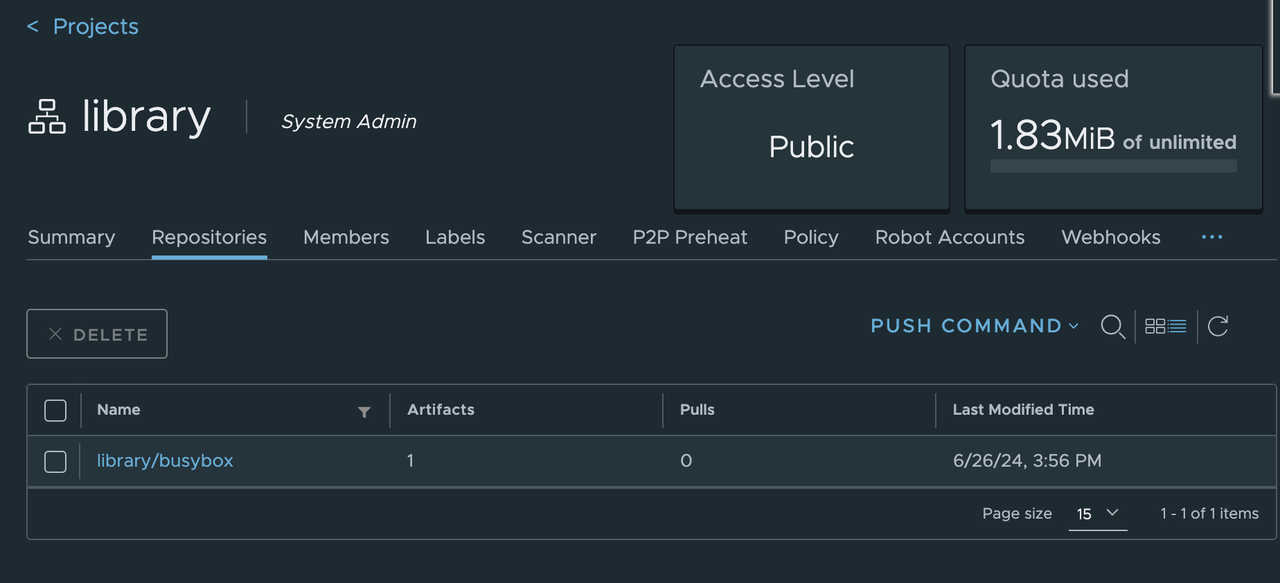
Push a test image busybox to the Harbor registry.
docker docker tag busybox harbor.domain.com/library/busybox
docker push harbor.domain.com/library/busybox
You can see that the image is successfully pushed to the Harbor registry.
Now, simulate a failure of the primary pod of the PostgreSQL cluster.
# Enter the primary pod
kubectl exec -it mypg-postgresql-0 -n demo -- bash

# Delete the data directory of PostgreSQL to simulate an exception
root@mycluster-postgresql-0:/home/postgres# rm -fr /home/postgres/pgdata/pgroot/data
View logs to observe how the roles of pods switch when an exception occurs.
# View the primary pod logs
kubectl logs mypg-postgresql-0 -n demo
In the logs, the leader lock is released from the primary pod and an HA switch occurs. A new replica has been created using backup data. The service recovers within a few seconds.
2024-06-26 08:00:51,759 INFO: no action. I am (mypg-postgresql-0), the leader with the lock
2024-06-26 08:01:01,726 INFO: Lock owner: mypg-postgresql-0; I am mypg-postgresql-0
2024-06-26 08:01:01,802 INFO: Leader key released
2024-06-26 08:01:01,824 INFO: released leader key voluntarily as data dir empty and currently leader
2024-06-26 08:01:01,825 INFO: Lock owner: mypg-postgresql-1; I am mypg-postgresql-0
...
2024-06-26 08:01:04,475 INFO: replica has been created using basebackup_fast_xlog
2024-06-26 08:01:04,475 INFO: bootstrapped from leader 'mypg-postgresql-1'
2024-06-26 08:01:04,476 INFO: closed patroni connection to the postgresql cluster
# View secondary pod logs
kubectl logs mypg-postgresql-1 -n demo
The original secondary pod mypg-postgresql-1 has obtained the leader lock and become the primary pod.
2024-06-26 08:02:13,638 INFO: no action. I am (mypg-postgresql-1), the leader with the lock
View the status of the PostgreSQL cluster and pods. After the failover, mypg-posgresql-0 becomes the secondary pod and mypg-postgresql-1 becomes the primary pod.
kubectl -n demo get pod -L kubeblocks.io/role
>
NAME                                   READY   STATUS    RESTARTS   AGE   ROLE
...
mypg-postgresql-0                      4/4     Running   0          89m   secondary
mypg-postgresql-1                      4/4     Running   0          26m   primary
...
Connect to the PostgreSQL cluster to view the replication information in the primary pod.
postgres=# select * from pg_stat_replication;

The result shows that mypg-postgresql-0 has been assigned as the secondary's pod.
Validate the service of the Harbor cluster. Here we pull the busybox image we pushed earlier. The image is successfully pulled from the Harbor registry. We also push a new image hello-world. The image is also successfully pushed to the Harbor registry. After the failover, both the read and write functionalities of the Harbor cluster have been restored, demonstrating the effectiveness of the high availability feature provided by Kubeblocks.

KubeBlocks offers the capability of both vertical and horizontal scaling. You can effortlessly scale the cluster by executing the following command.
Vertical scaling
kbcli cluster vscale mypg \
--components="postgresql" \
--memory="4Gi" --cpu="2" \
--namespace demo
Horizontal scaling
kbcli cluster hscale mypg
--replicas 3 \
--namespace demo \
--components postgresql
By integrating KubeBlocks, you can set up a high-availability Harbor cluster in only 5 minutes, ensuring your Harbor cluster provides continuous and reliable services. KubeBlocks simplifies the entire setup process, allowing you to focus on more important tasks without worrying about the configuration and management of the underlying infrastructure.